

Hey, how are you doing? Thought I would write about setting up Pester tests, and the structure I use. This comes about because when I need to start a new project and have some Pester tests running against the infrastructure I have a standard setup I use. So I decided to share it as it might be useful for other people coming to Pester.
To try to give this some context, imagine there is a PowerShell process which is creating folders and assigning permissions to them. All users are given an ID number, for example, Fred Smith has the ID 1234 and Janet Foley has the ID 5678 so the folders will be called 1234 and 5678. The script picks up a CSV file which contains one or more lines of information, here is an example of the file
1234,1234,111,preproduction
5678,1234,110,preproduction
There are two lines of information, taking the top line, the first element is the UserID, the second element is the Folder Name, the third element is the permission, and the fourth element is the environment. The same for the second line. It’s saying please give User 1234, 111 Permissions to the folder 1234 in the preproduction environment. The second line is saying please give User 5678. 110 Permissions to folder 1234 in the preproduction environment.
These folders get created in the “C:\Sales” directory.
We want our Pester tests to test that the user’s folders are created.
Pester Setup
I separate out the tests, reports, functions and core files. This makes it easier to follow and re-use the code.
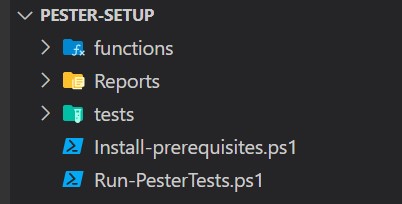
Create the folders and files in the image below:-
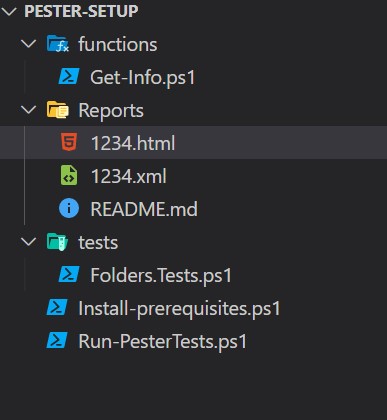
In the next screenshot, I’ve opened the folders so you can see the structure. Although this is a basic setup, it will scale as you grow your tests. Create Get-info.ps1 and the Folders.Tests.ps1 files. Save them empty.
In the reports folder, there are two files 1234.html and 1234.XML. Don’t bother to create them. These are from a previous run, they are there just to give you an idea of what happens when you run Pester. The XML file is created from the Invoke-Pester command and the HTML file is created by running the reportunit.exe.
Prerequisites
To run Pester tests we need to install the Pester module. You can do this via the command line with the command install-module Pester but you may want to run this as part of a pipeline, on an agent machine, which may require it to be installed every time the pipeline runs. For that reason, I always add it to a separate file. This can also contain any other PowerShell modules you may require.
Create a file called Install-prerequisites.ps1 and copy the code below to it. The code will check if you have the Nuget provider installed, and install if you don’t. Then it will install any required modules, we only have one module we need to use, Pester and we have a version we want to install. It is good practice to set the version. If needed you can add other modules to the file. Where it has @{ Name = 'Pester'; Version = '5.3.3'}, you can add another module below for example say one of your tests required Azure commands, you could add @{ Name = ‘az’} under the Pester one. Note:- you don’t have to specify the version, it will use the latest if not specified.
For each of the modules, it will run through trying to install them. You could add to this and check if the module has already been installed.
<#
.SYNOPSIS
    This script install PowerShell Modules if required
.DESCRIPTION
    This script installs PowerShell Modules, it will also install the Nuget provider if requried.
.INPUTS
    None
.OUTPUTS
    None
.NOTES
    Version:            1.0
    Author:             Your Team Name
    Creation Date:      01/01/1970
    Purpose/Change :    To run pester tests
#>
$modules = @(
    @{ Name = 'Pester'; Version = '5.3.3'}
)

if ($null -ne $modules) {
    Write-Host "Installing Nuget Provider"
    Install-PackageProvider - Name Nuget -Force -Scope CurrentUser
}

foreach ($m in $modules) {
    Write-Host "Installing $($m.name) ($($m.Version)) into current user"
    Install-Module -Name $m.Name -RequiredVersion $m.Version -Force -Scope CurrentUser -AllowClobber #-SkipPublisher
}
The next file to create is the file that runs Pester. As you will see from the code it starts by running the Install.prerequisites.ps1 file and installS any modules needed. Then it loads all the functions in the functions folder. The next bit of code creates a set of parameters to run against Pester. The $container variable gets the path of the Pester tests and sets a parameter I want to send to all of the test files. In this example, it’s a variable called CSVNo. It’s the CSV filename. You don’t have to send variables to the tests. You could leave the -DAta @{ CSVNo="$CSVNo" } off and remove the param section at the top of the code as well. It’s there so I can pass the CSV file name to the pester tests.
<#
.SYNOPSIS
    This script runs a number of pester tests
.DESCRIPTION
    This script installs and runs pester tests
.INPUTS
    None
.OUTPUTS
    None
.NOTES
    Version:            1.0
    Author:             Your Team Name
    Creation Date:      01/01/1970
    Purpose/Change :    To run pester tests
#>
[CmdletBinding()]
param (
    [Parameter()]
    [string]
    $CSVNo
)
# Install Prereqs
. .\Install-prerequisites.ps1

# Load functions
Get-ChildItem -Path .\functions | foreach-object {
    . $_.FullName
}

# Set the container and the configuration params
$container = New-PesterContainer -Path .\tests -Data @{ CSVNo="$CSVNo" }
$configuration = [PesterConfiguration]@{
    Run         = @{
        Container = $Container
    }
    Output      = @{
        Verbosity = 'Detailed'
    }
    TestResult  = @{
        Enabled         = $true
        OutputFormat    = "NUnitXml"
        OutputPath      = ".\Reports\$CSVNo.xml"
    }
}

# Run Pester
Invoke-Pester -Configuration $configuration

# Create HTML Report
.\ReportUnit.exe ".\Reports\$CSVNo.xml" ".\Reports\$CSVNo.html"
The $configuration is another set of parameters which set the output to ‘Detailed’. In Pester, there is a simple view of the test results and a detailed one. Detailed is the one I prefer. The TestResult is a telling Pester I want a report in the NUnitXml format and where to create the report. In this case in the Reports directory.
We Invoke-Pester with the $configuration. This will run the tests (I’ll come on to the tests soon)
The final piece is to create a nice-looking report using the ReportUnit.exe which creates an HTML file.
Set up the tests
So we have our structure, What we need to do next is create a test, let’s define the test we want to perform. we have a number of folders that should have got created with specific names, which are created from a CSV file. We need to get the CSV file, read it and then create a list of the folder names so we can run the tests against it. To do this we will create a function, but we don’t want it as part of our tests, so we have put it in the functions folder.
Create the function
In the functions folder we had created Get-Info.ps1 and add this code to it.
<#
.SYNOPSIS
    This script runs a number of pester tests
.DESCRIPTION
    This script installs and runs pester tests
.INPUTS
    None
.OUTPUTS
    None
.NOTES
    Version:            1.0
    Author:             Your Team Name
    Creation Date:      01/01/1970
    Purpose/Change :    To run pester tests
#>
param($CSVNo)

Function Get-Info{
    $CSVFile = Get-Content "C:\CSVFile\$CSVNo"
    $Users = @{}
    foreach ($CSVFileLine in $CSVFile) {
        $UserID, $FolderName, $Permission, $Environment = $CSVFileLine -split ','
        $user = New-Object -TypeName psobject -Property @{
            UserID     = $UserID
            FolderName  = $FolderName
            Permission  = $Permission
            Environment = $Environment
        }
        $Users += $user
    }
    $Users
}
The function gets the content of the CSV file. It builds an object with the information which we can run tests against. If you are wondering what the CSV file looks like go back up to context. You can create the file yourself to test this end to end.
Tests
Finally we can create a test. Open the file Folders.Tests.ps1 you created earlier and copy the code below in to it.
<#
.SYNOPSIS
    This script runs a number of pester tests
.DESCRIPTION
    This script installs and runs pester tests. The will check if the users folder exists
.INPUTS
    None
.OUTPUTS
    None
.NOTES
    Version:            1.0
    Author:             Your Team Name
    Creation Date:      01/01/1970
    Purpose/Change :    To run pester tests
#>
param($CSVNo)
Write-Warning "CSVNo $CSVNo"

# Run function
$folderName = Get-Info

# Create Testcase(s)
$testCase1 = @()

($folderName) | ForEach-Object {$testCase1 += @{
    FolderName = $_.FolderName
}}
# End of test case setup

# Start of Tests

Describe "Check folders" {
    Context "Test each folder exists" {
        It "<folderName> should exist" -TestCases $testCase1 {
            Param($folderName)
                $doesitexist = Test-Path -Path "C:\Sales\$folderName"
                $doesitexist | should -be $true
        }
    }
}
In the script, we call the function we created and then use that information to create a test case. You don’t have to use a test case but I think it’s better to do so. Although the function gathers all of the information, we are not going to use it in the test case. We only add what is required. We only add the Folder Name because we only need to test that the folder exists.
Some context on the Describe, Context, It code.
Describe block is used to group tests. The title of it should be something to refer to the group of tests, like VM tests or Check Folders.
The Context is interchangeable with Describe. Context should be used to set the aspect of the test you are running. In this case, it says Test each folder exists, If we were to create another test for folders that should have been removed, we could still keep the test under the Check Folders Describe block but create another Context called Test each folder has been removed.
The It is used to give more meaning to the test, we can pass in variables <foldername> which will be replaced with the actual folder name. so the It block would read 1234 should exist. This is very useful when trying to work out which test has failed.
Reports
With Pester, it creates a NUnitXml report, which is fine for pipelines, like ADO, But if you want to just create an HTML report then you can use the ReportUnit.exe to generate a report. This can be found in the Nuget package at https://www.nuget.org/packages/ReportUnit/. Just rename the Nuget package to .Zip and unzip it. In the extracted folder you will find the ReportUnit.exe file
Running the Pester Tests
To run the Pester tests, just run Run-PesterTests.ps1. It will output green text for passed and red text for failed tests.
Conclusion
Pester is a great testing framework, give it a go.