

So what do we have to do
- Get a Certificate and store it somewhere the virtual machine can access – (Key Vault)
- Add the code to the Terraform Virtual Machine Resource code.
- Run a PowerShell command to connect into the virtual machine.
1. Get a certificate
There are two ways I’m going to cover to get a certificate. Both will get a certificate installed in a key vault
- Create a self-signed certificate in Azure (it’s free)
- Create a self-signed certificate, using PowerShell commands (it’s free as well but a bit longer to do)
Create a self signed certificate in Azure (it’s free)
To create a self-signed certificate in Azure, go into a key vault that you have created.
Click on Certificates in the left pane, then in the main pane, click on “Generate/Import” (fig5)

A new pane will appear as below, fill in the certificate as you see fit. If you want to follow what I did (fig6), I just filled in the certificates name, and the Common Name. As you can see in the image the Common Name MUST be in the following format :- "CN=RogersComputers" the important bit here is the quotations and the CN=. It could read “CN=RogersBuses.com” or “CN=anythingyouwant” but it must contain the quotations and the CN=. Then click on Create and you will see the certificate has been added to the Key Vault Certificate Store.

Next, you just need to make note of the Certificates SECRET URL. This can be found by clicking on the certificate (fig7), and then click on the Current version of the certificate (fig8).

Scan down to the bottom of the certificate information, the URL you want is the bottom one on the list – SECRET IDENTIFIER copy and paste this to notepad or to VS Code or wherever you want, or just remember where it is, as you will need it for the Terraform code.

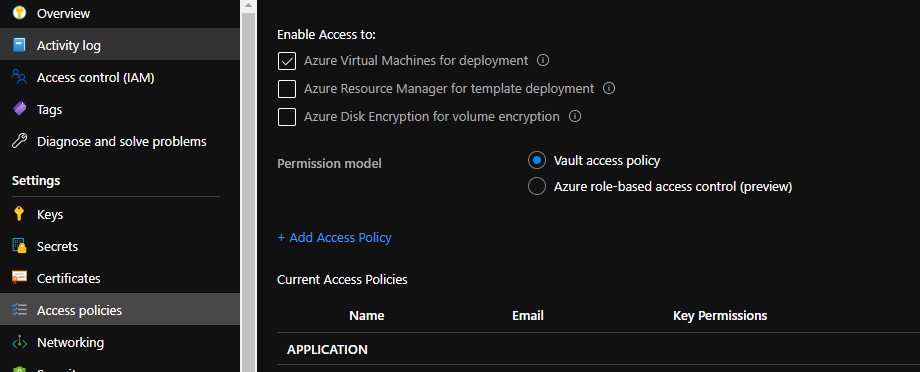
Make sure you enable access to: Azure Virtual Machines for Deployment in the Access Policy of the Key Vault. (fig9)
Thats it, you can move on to section 3, which is on the next page.
Create a self-signed certificate, using PowerShell commands.
Open up a PowerShell window (I’m using powershell core) and use the following commands.
$certificate = New-selfSignedCertificate -CertStoreLocation Cert:\LocalMachine\My -DNSName "RogersComputers"That will create the following certificate (fig10)

Now we need to export it. To do that we use the following command.
$password = ConvertTo-SecureString -string "yourpassword" -force -AsPlainText
Export-PfxCertificate -Cert $Certificate -filePath C:\certificate.pfx -password $password
This will export the certificate ready for you to import in to the Key vault. Couple of things regarding the above code. first off, the certificate must be in a PFX or PEM format to import it into a key vault. Second, you need to password protect your certificate.
Next we need to upload the certificate to the key vault. Go into the Key Vault, click on Certificates in the left pane. Click on Generate/Import (fig11), change the top option “Method of Certificate Creation” (fig12) from Generate to Import.

Give the certificate a name and upload the certificate file you created. Don’t forget to specify the password you set.
If you want to import it using PowerShell, here is the command. The name of the certificate can be whatever you want it to be. The password is using the previously created variable from above, but if you don’t want to look back in the page I’ve added the command below.
$password = ConvertTo-SecureString -string "yourpassword" -force -AsPlainText

Import-AzKeyVaultCertificate -VaultName "thenameofthevault" -name "certificatename" -FilePath "C:\certificate.pfx" -Password $Password
and thats it. Whichever process you use it will achieve the same thing.
Make sure you enable access to: Azure Virtual Machines for Deployment in the Access Policy of the Key Vault. (fig13)

Continued on the next page