

If you are using Azure, and deploying AKS then a good option to store your secrets is to use Key vault. So how do you do that with AKS?
There is an open source project which isn’t supported my Azure but does seem to be the prime way to use Key Vault with AKS. The Secrets Store CSI Driver can be found here https://github.com/kubernetes-sigs/secrets-store-csi-driver.
The way it works, you access and retrieve secrets from your Key vault by mounting the secrets into the Kubernetes pods as a volume, via the Store Container Storage Interface (CSI).
To follow this example, you will needed?
- A deployed AKS Cluster with system managed Identity enabled
- Installed Helm on your machine
- A Azure Key vault, with Secrets
What am I going to cover?
- Define a SecretProviderClass object by using the Secrets Store CSI driver.
- Deploying the secrets store CSI driver to a cluster
- Provide the rights to the AKS Cluster to read the managed identities.
- Azure Key vault Provider for the CSI Driver
- Prove it works
Then you can deploy a pod with a mounted volume full of secrets from your Key vault.
Off we go!
1, OK, lets start. If you haven’t got the Azure-cli and kubectl installed in you machine. You will need to them to connect to a Cluster.
This will install Azure CLI
if you are using Azure cli

az aks install-cli


if you are using PowerShell

Install-AzAksKubectl
Next, you need to get the credentials from the AKS cluster and store them locally in your kube config. Use the following commands.
if you are using Azure cli

az aks get-credentials --resource-group myResourceGroup --name AKSClustername


if you are using PowerShell
Import-AzAksCredential -ResourceGroupName myResourceGroup -Name AKSClustername


Then check you are connected

kubectl get nodes

You may need to login at this point
This should return some nodes
To set the cluster up to access Key Vault we need to get some information. If you have to hand your Subscription ID and know the Node Resource Group (the resource group which your virtual machine scale set(s) got deployed to.) If you don’t know, you can get the information from the AKS Cluster, Run the command below and copy subscriptionId and the nodeResourceGroup to use later.
using Azure cli
az aks show --name AKSClustername --resource-group myResourceGroup
2. If you haven’t, install Helm
Install Helm using one of the package managers, for windows.
choco install kubernetes-helmIf you don’t have chocolately installed or are using another OS see https://helm.sh/docs/intro/install/ to find out how to install it.
3. Install the Secrets Store CSI Driver and Azure Key Vault provider for the driver. Use the commands below.
helm repo add csi-secrets-store-provider-azure https://raw.githubusercontent.com/Azure/secrets-store-csi-driver-provider-azure/master/charts
helm install csi-secrets-store-provider-azure/csi-secrets-store-provider-azure --generate-name
This will add it as a workload to Kubernetes. You can check if it’s installed either via the portal. Goto your cluster, click on workloads and then on pods

Or you can check via the command lines below. Look for some pods starting with CSI-secrets-store-provider….
kubectl get pods
or
kubectl get secretproviderclass
For information on the Driver follow this link https://github.com/Azure/secrets-store-csi-driver-provider-azure/tree/master/charts/csi-secrets-store-provider-azure#configuration
4. If you haven’t created your Azure Key Vault and added some secrets. You can follow this link. https://docs.microsoft.com/en-us/azure/key-vault/secrets/quick-create-cli
5, Create the SecretProviderClass object. This is where you set all your key vault information. It’s recommended to use this template, link to the repo is below as well in case it’s been updated since writing this.
# This is a SecretProviderClass example using system-assigned identity to access Keyvault
apiVersion: secrets-store.csi.x-k8s.io/v1alpha1
kind: SecretProviderClass
metadata:
  name: azure-kvname-system-msi
spec:
  provider: azure
  parameters:
    usePodIdentity: "false"
    useVMManagedIdentity: "true - SET THIS TO TRUE"    # Set to true for using managed identity
    userAssignedIdentityID: "FILL THIS IN"      # If empty, then defaults to use the system assigned identity on the VM
    keyvaultName: "FILL THIS IN"
    cloudName: ""                   # [OPTIONAL for Azure] if not provided, azure environment will default to AzurePublicCloud
    objects:  |
      array:
        - |
          objectName: secret1 FILL THIS IN
          objectType: secret        # object types: secret, key or cert
          objectVersion: ""         # [OPTIONAL] object versions, default to latest if empty
        - |
          objectName: key1
          objectType: key
          objectVersion: ""
    tenantId: "FILL THIS IN"                 # the tenant ID of the KeyVault
Ok, so this bit got me. I could get the settings correct, hence why I wrote this. I’ll explain as we continue. Remember this example is based on the AKS cluster been enabled with system managed identity.
You will need to update
- useVMManagedIdentity = true
- userAssignedIdentityID = this needs to be filled in, I know it says in the notes to leave it blank but it won’t work if you don’t fill it in and I’ll explain below what to put in it and why.
- Fill in your Key Vault name
- Fill in the objects as your secrets names
- Fill in the Tenant ID
Link above is to the repo where the yaml is from. There are a couple of other options, service principal and user managed identity they are all in the same repo.
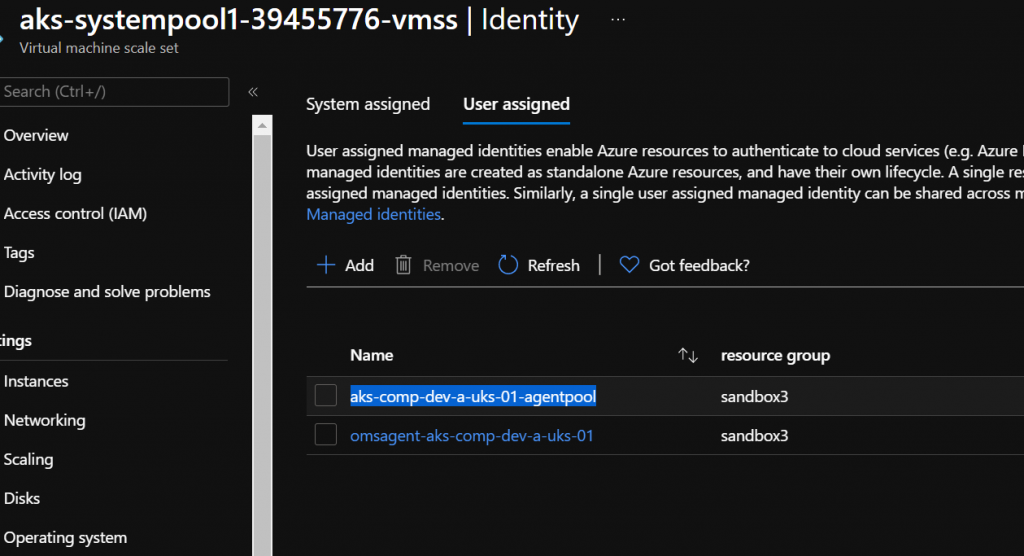
Filling in the UserAssignedIdentityID
When you create an AKS cluster with system assigned managed ID set. The Cluster will get a system assigned ID. You would think seeing as it’s called system assigned CSI Driver that this would be the ID to use, and if you read the notes on in the file, it says to leave it blank if you are using a system assigned ID. However, when you create an AKS, it creates a User Assigned Managed ID for your VMSS’s which is called “Your-Cluster-Name-agentpool” Every agent pool that is part of the cluster gets assigned this User Assigned identity and this is what needs to get added as the ID for UserAssignedIdentityID.
Against the VMSS, run the following:-
az vmss identity show -g noderesourcegroup -n aks-userpool1-39455776-vmss -o yaml If you have more than one user-assigned ID, and you are unsure which one remember, it’s the one that ends with agentpool and it’s NOT the principalID. You want the ClientID. So put the ClientID in the UserAssignedIdentityID. Save the file as SecretProviderClass.yaml.
To view all the options you can set in this file, see here https://azure.github.io/secrets-store-csi-driver-provider-azure/getting-started/usage/#create-your-own-secretproviderclass-object
6, time to deploy the Secret Provider Class. Simple to do, Use the command below
kubectl apply -f ./SecretProviderClass.yamlThis will deploy the class ready to use in pods. Using the template below, have a look at it and you can see where it specifies a volume. In the pod, it will be mounted to /mnt/secrets-store and you can see it refers to the CSI driver. Important note: they must be deployed to the same namespace. if you haven’t specified one then it will go to the default namespace. Save the file as busybox-secrets.yaml. We’ll come back to this.
# This is a sample pod definition for using SecretProviderClass and system-assigned identity to access Keyvault
kind: Pod
apiVersion: v1
metadata:
  name: busybox-secrets-store-inline-system-msi
  namespace: default
spec:
  containers:
    - name: busybox
      image: k8s.gcr.io/e2e-test-images/busybox:1.29
      command:
        - "/bin/sleep"
        - "10000"
      volumeMounts:
      - name: secrets-store01-inline
        mountPath: "/mnt/secrets-store"
        readOnly: true
  volumes:
    - name: secrets-store01-inline
      csi:
        driver: secrets-store.csi.k8s.io
        readOnly: true
        volumeAttributes:
          secretProviderClass: "azure-kvname-system-msi"
7, Set the User Assigned ID access to the Key Vault. Do this via the portal or command line.
In the portal, click on Key Vault, click on Access Policy, Add the User assigned ID, the agentpool one and set the GET permission on the secrets policy.
If you want to do it via the command line, change the key vault name and the name of the VMSS.
$keyvault = "youkeyvaultname"
$clusterinfo = Get-AzVmss -Name aks-userpool1-39455776-vmss
$userai = $clusterinfo.identity.userassignedidentities
$agentpoolid =  $userai.keys -like '*agentpool'
$userai.Getenumerator() | foreach-object {
if ($_.key -eq $agentpoolid){

$clientid = $_.value.clientid
}
}
Set-AzKeyVaultAccessPolicy -VaultName $keyvault -ObjectId $clientid -PermissionsToSecrets get
8, Next, we need to deploy a pod, that will use the Key Vault. So using the YAML we created earlier, run the first command below. Then after it has deployed, check there are no errors mounting the volume with the second command.
kubectl apply -f ./busybox-secrets.yaml

kubectl describe pod/busybox-secrets-store-inline-system-msi
9, See if you can get the secrets. This is the final step. Run the following commands. First command should return a list of secret names. The second command should show you the secret.
kubectl exec bustbox-secrets-store-inline-system-msi -- ls /mnt/secrets-store
kubectl exec bustbox-secrets-store-inline-system-msi -- cat /mnt/secrets-store/adminpassword
Hope this was helpful. Leave a comment please.

Comments are closed.